Devils Workshop

has been moved to new address

http://www.devilsworkshop.org

Sorry for inconvenience...

Two Peas and Their Pod: March 2009

Monday, March 30, 2009

Live on Studio 5


I was recently contacted by Studio 5, a day time lifestyle show on KSL- NBC's affiliate in Salt Lake City. They stumbled upon my blog and fell in love with my Banana Cinnamon Chip Cake and asked me to make it at the studio, LIVE. 

I have done a lot of TV interviews for my "real" job, the topic is always something health related. The segments are short and no big deal, but to cook LIVE on TV, that is a different story. Of course I agreed to do it, but I was a little nervous.

Well today was the big day! I got up early to work out and make the "show" cake. I also measured out all of the ingredients for the live segment. Josh was sweet and came with me to the studio. I got there plenty early so I could set up and breathe:) My segment was in the middle of the show. It was fun watching the other segments behind the scenes:)

The butterflies hit me when I saw the "teaser" of my segment. It was too late run though, I was already there and ready to go. Darin, one of the hosts, was in the kitchen with me. He made me feel very relaxed and was easy to talk to. I demonstrated how to make the cake and talked about our blog for a bit. It was actually a lot of fun. Everyone loved the cake too. I am glad it was a success. 

If you want to watch the video clip, click here. I really hate watching myself, but I know my friends and family will appreciate the link, so ENJOY! 

If you haven't tried my banana cinnamon chip cake, I suggest you do. It is delicious and SO easy! 


Labels: ,

Sunday, March 29, 2009

Jake's Chocolate Chip Cookies


Our friend Jake makes the best chocolate chip cookies. He made me a batch for my birthday in February and I was in heaven..and so was Josh. Josh was eating them so fast I had to hide some in the freezer for later:) Well, he eventually found those and the cookies were gone. It was a sad day.

Well, good news! Jake recently shared his secret recipe with me. I was so excited, but a little nervous to bake them. I didn't want to ruin a good thing. I eventually got over my stage fright and whipped up a batch.

I was surprised there wasn't any super special secret ingredient. The recipe looked pretty basic, just like any other chocolate chip cookie recipe. I think the big difference was using quality ingredients, creaming the butter and sugar for a long time, and there was no baking powder involved.

I followed Jake's instructions to a T and the results were outstanding! The cookies were divine! Thanks Jake. The recipe is below, in Jake's words. Now, I just have to refrain myself from making them every week. Having this recipe could be dangerous:)


Jake's Chocolate Chip Cookies

(Printable Recipe)

Here is my basic recipe as good as I can remember it. I don't really have it written down I just know what goes in. :-)


2 sticks of good unsalted butter. ( I use the Land o' Lakes European style)
1 cup of white Sugar
1 cup dark brown sugar

Cream together for at least 5 minutes. I cream the butter and sugar until it has turned nearly white. It takes at least 5 minutes sometimes more depending on the temp of the butter.

3 Eggs

Add one at a time mixing well.

2-3 tsp Vanilla Extract (the good stuff)
1 tsp baking soda
3/4 tsp salt

2-3 Cups flour (I used 3)

Be careful not to add too much flour. A lot of good cookies have gone bad because of too much flour. I will usually mix in 2 cups and let the mixer go for about 5-6 minutes then adjust with a little bit more 1/4 cup at a time.

Bag of quality chocolate chips. (Jake recommends
Ghirardelli but I used chopped up bars of Scharffen Berger. This is the only change I made to the recipe.)

Mix well. If needed add an additional 1/4 cup of flour but not too much. Once the chips are in you can't mix for too long so any flour you add may not get mixed in completely.

Bake at 350 for 9-12 minutes depending on size of cookie. I don't rotate pans or anything like that. I put in a single pan at a time and cook until they are done. I leave the door closed until the timer goes off and I check them. Cookies aren't souffles but I kind of treat them like souffles. I like the individual variations that can occur in doneness by not rotating the pan.

Labels: ,

Friday, March 27, 2009

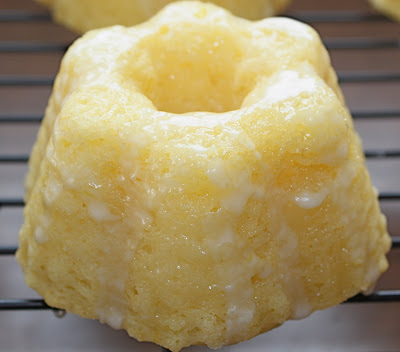
Mini Lemon Bundt Cakes


It is technically Spring, but in Utah we are still getting snow. I am beyond sick of it. I really want sunny days, green grass, blooming flowers, etc. It is the end of March, I don't feel like I am asking too much.

I made these mini lemon cakes to cheer me up. Lemon desserts always do the trick. I used my favorite lemon cake recipe from Ina. This recipe never lets me down. I really enjoyed using my new mini bundt pan too. The cakes are adorable! They are the perfect size and they actually came out easily, sometimes I get nervous with the pretty pans!

I think these little cakes would be fun to serve at a dinner party, garnished with fresh berries. If you don't have a mini bundt pan, you can use a loaf pan, muffin tin, really any pan will do!

Have a great weekend everyone. I hope it is Spring wherever you are!!


Labels: , ,

Thursday, March 26, 2009

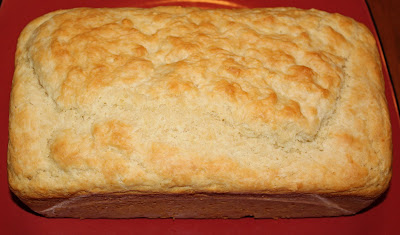
Buttermilk Biscuit Bread


Once again I needed to use up some buttermilk. I don't know why I always buy so much and wait until the last minute, but it always happens. Oh well, I am glad because then it forces me to bake and try new recipes.

This time I tried a Buttermilk Biscuit Bread. It was a simple recipe and all of the ingredients are probably in your kitchen already. If you don't have a buttermilk obsession like me and don't have any on hand, you can add lemon juice or vinegar to regular milk and use that.

The bread was moist, with a nice crumb. It also tasted like a biscuit, but in a loaf form. We sampled it fresh out of the oven and it was good, but I think it was even better the next day. Odd, but true! Josh enjoyed toasting it for breakfast with homemade strawberry jam.


Buttermilk Biscuit Bread

(Printable Recipe)

  • 3 cups all-purpose flour
  • 1 tablespoon baking powder
  • 1/3 cup white sugar
  • 1 teaspoon salt
  • 1 teaspoon baking soda
  • 1 egg, lightly beaten
  • 2 cups buttermilk
  • 1/4 cup butter, melted
  1. Preheat oven to 325 degrees F (165 degrees C). Grease a 9x5 inch loaf pan.
  2. Combine flour, baking powder, sugar, salt and baking soda. Blend egg and buttermilk together, and add all at once to the flour mixture. Mix just until moistened. Stir in butter. Pour into prepared pan.
  3. Bake for 65 to 70 minutes, or until a toothpick inserted in the bread comes out clean. Cool on a wire rack. Wrap in foil for several hours, or overnight, for best flavor.

Labels: , , ,

Wednesday, March 25, 2009

Oatmeal Cookies with Lime, Coconut, and White Chocolate


I recently created a special cookie for my Joshua. He loves my oatmeal chocolate chip cookies, so I used the oatmeal dough as the base. He is also in love with everything lime, so I added in lime zest and a couple drops of fresh lime juice. I wasn't sure how the juice would take to the cookies, so I just added a little. I had a good thing going, so I continued on.

Next, I added in coconut and chopped chunks of premium white chocolate. Oh yea, now we are talking. An oatmeal cookie with lime, coconut, and white chocolate. I tested the dough and was pretty confident in my creation.

After I pulled them from the oven and allowed them to cool, it was time for the taste test by the one and only, Joshua. He was excited to try "his" special cookie. Luckily, it was a winner. He loved my new creation! It was fun playing around with a new recipe for my sweetie!


Oatmeal Cookies with Lime, Coconut, and White Chocolate

(Printable Recipe)

½ c. brown sugar

1/2 c. white sugar

1/2 cup softened unsalted butter

1 egg

1 tsp. Vanilla

Zest of 1-2 limes (I used 2)

A couple drops of fresh lime juice

1/4 tsp. Salt

1/2 tsp. Baking powder

1/2 tsp. Baking soda

1 1/4 c. flour

1 1/4 c. oats

About 3/4 cup coconut

About 1 cup white chocolate chunks (or chips)

Cream the butter with the sugars until soft and creamy, using a mixer. Add in egg and vanilla. Add in lime zest and juice. Mix briefly. In a separate bowl combine the salt, baking powder, soda, flour. Add to wet ingredients. Mix until blended. Add your oats and then your coconut and chocolate.

Bake at 375 for 10-12 minutes! Don’t let them get too done…they are better when they are soft!

Labels: , , , ,

Tuesday, March 24, 2009

Vegetarian Pho


What is Pho??? I honestly had never heard of it, until recently. Our foodie friend, Ben, was coming over for dinner and suggested we make Pho. I was assuming it was a food item, but I really had no clue. He had to explain it:) Once he did, I was sold!

I am sure most of you know what it is, but in case you are unsure here is a little Pho 101. First of all, it is pronounced "Fuh." It is
is a traditional Vietnamese thinly sliced meat and rice-noodle soup dish. The broth is generally made by simmering beef (and sometimes chicken) bones, oxtails, flank steak, charred onion, and spices, taking several hours to prepare.

The spices generally include:
cinnamon sticks, cloves, coriander pods, star anise and cardamom. The noodles in Pho are typically rice noodles, dried or fresh. The dish is garnished with ingredients such as green onions, cilantro, Thai basil, fresh Thai chili peppers, lime wedges, and bean sprouts. These items are usually provided on the side. Some sauces such as hoisin sauce and the Thai hot sauce, Sriracha are popular additions as well.

Is everyone feeling educated now? Most of you know we don't eat beef and are probably wondering why I would try Pho. Well, there are many variations and Ben was nice enough to let us create a vegetarian version. Ben made a homemade vegetable broth for the base of our Pho. We bought the rice noodles and a Pho spice packet from our local Asian Market, you can make your own packets, but this was easier:)

For the veggie version, we steamed bok choy, green beans, broccoli rabe, and snow peas. We also used cooked cubed sweet potatoes. For our toppings we used bean sprouts, lime wedges, chili peppers, Thai basil, cilantro, and green onions.

This really was a fun dinner. I enjoyed trying Pho, even if it wasn't technically the traditional version. The veggie Pho was outstanding. I loved incorporating so many vegetables into the soup and it was fun letting everyone choose their own toppings and flavors.

Would I make or eat this again? PHO SURE! Sorry there isn't an exact recipe. If you have questions let me know. If you would like to try a traditional recipe, Steamy Kitchen, has a great one on her blog. 


Labels: , ,

Sunday, March 22, 2009

Chocolate Mint Thumbprint Cookies


I recently created an account on Twitter, I really wasn't sure how it worked or what it involved, but I soon found out and now I am addicted. Josh thinks I need professional help:) It is fun to "chat" with so many friends and everyone is so helpful. If I have a question, it is usually answered in minutes by a couple of different people. I think Twitter is broadening my horizons and expanding my knowledge:) See, it is a good thing!

I was on Twitter awhile ago and saw Dawn's tweet about some cookies she just made. Of course, I hurried over to her blog to check them out. She made Recipe Girl's, Chocolate Mint Thumbprints. The cookies looked incredible! I immediately added them to my never ending baking list.

I never buy Girl Scout cookies, don't get me wrong I love cookies and adorable little girls, but I don't need any extra sweets in my house. I bake too much as it is. Everywhere I turn though I am haunted by GS cookies, especially the thin mints. So to curve my craving, I decided to bump the Chocolate Mint Thumbprints to the top of my list.

I really enjoyed making these cookies. The cookie part was similar to a chocolate shortbread, the perfect base for a mint filling. I melted Andes mint chips for the filling since I had them on hand. Chocolate and mint are meant to be together if you ask me. These cookies kicked my Thin Mint craving for sure! Thanks to Dawn and Lori, my Twitter buddies:) See without Twitter I wouldn't of made these fabulous cookies, it is helpful in so many ways:)

If you want to follow me on Twitter, click here.
For the Chocolate Mint Thumbprint recipe, click here.


Labels: ,

Friday, March 20, 2009

Recipe for Buttermilk Drop Biscuits


I love testing out different recipes. I think Joshua gets sick of it though. He is always begging to make some of his favorite recipes that we have made in the past, but I usually shoot him down because I want to try something new. So we rarely eat the same thing twice. If we do it is at least a month later.

I love homemade biscuits and have been testing out different recipes. So far we have posted two of our favorite recipes, one from Pinch My Salt and one from Hell's Backbone Grill. They are both really good, just different.

Well, we tried another new recipe and we loved this one as well. This one came from Cooks Illustrated. It is a drop buttermilk biscuit, so it was super easy to make. The texture was a little more "hearty" than soft and flaky. The biscuits were also a little "thicker" than the others. They were VERY good! I loved the added texture that came with this biscuits and the rustic feel. I enjoyed mine with a drizzle of warm honey.

If you are a biscuit lover, give all of these a try. We love them all. I might have to do a blind taste test to find out my favorite. They are all so tasty!


Buttermilk Drop Biscuits
Adapted from Cooks Illustrated

(Printable Recipe)

2 cups (10 ounces) unbleached all-purpose flour
2 teaspoons baking powder
1/2 teaspoon baking soda
1 teaspoon sugar
3/4 teaspoon table salt
1 cup cold buttermilk
8 tablespoons unsalted butter, melted and cooled slightly (about 5 minutes), plus 2 tablespoons melted butter for brushing biscuits

Procedure

1. Adjust oven rack to middle position and heat oven to 475°F. Whisk flour, baking powder, baking soda, sugar, and salt in large bowl. Combine buttermilk and 8 tablespoons melted butter in medium bowl, stirring until butter forms small clumps.

2. Add buttermilk mixture to dry ingredients and stir with rubber spatula until just incorporated and batter pulls away from sides of bowl. Using greased 1/4-cup dry measure, scoop level amount of batter and drop onto parchment-lined rimmed baking sheet (biscuits should measure about 2 1/4 inches in diameter and 1 1/4 inches high). Repeat with remaining batter, spacing biscuits about 1 1/2 inches apart. Bake until tops are golden brown and crisp, 12 to 14 minutes.

3. Brush biscuit tops with remaining 2 tablespoons melted butter. Transfer to wire rack and let cool 5 minutes before serving.

Labels: , , ,

Thursday, March 19, 2009

Mini Banana Cupcakes with a Nutella Swirl


I love sweet treats. I usually eat really healthy, but put a dessert in my vicinity and I am in trouble:) Teanna, from Spork or Foon always entices me with her amazing photos of sinfully delicious baked goods. When I saw her Self Frosted Cupcakes, I knew I had to try them.

I heart Nutella. I could eat it by the spoonful. I try not to buy it because Josh is allergic and I really don't need it. After reading Teanna's post, I decided it was time for a splurge.

I love bananas and nutella together, so I thought I would try a little spin off from the Self Frosted Cupcakes. I made a banana cupcake with a Nutella swirl. I also made them in my mini muffin pan, for cuteness factor and portion control.:) I thought swirling the Nutella would be a pain in the rear, but it was kind of fun! I used a toothpick to do the trick.

They turned out really cute, but I am not sure if I should call them cupcakes. They had more of a muffin texture. They were moist and dense, not light and fluffy like I was hoping. They were still really good, just not what I was going for.

The banana and Nutella flavor was right on though. I think I will look for a different cupcake recipe to try them with....or maybe use a regular pan to see if that helps the texture. They were really good, just think muffin instead of cupcake. :)


Mini Banana Cupcakes (Muffins) with a Nutella Swirl
Adapted from EveryDay Food and Spork or Foon

(Printable Recipe)
  • 1 1/2 cups all-purpose flour (spooned and leveled)
  • 3/4 cup sugar
  • 1 teaspoon baking powder
  • 1/2 teaspoon baking soda
  • 1/4 teaspoon salt
  • 1/2 cup (1 stick) unsalted butter, melted
  • 1 1/2 cups mashed bananas (about 4 ripe bananas), plus 1 whole banana, for garnish (optional)
  • 2 large eggs
  • 1/2 teaspoon pure vanilla extract
  • Jar of Nutella
  1. Preheat oven to 350 degrees. Spray a mini muffin tin. In a medium bowl, whisk together flour, sugar, baking powder, baking soda, and salt.
  2. Make a well in center of flour mixture. In well, mix together butter, mashed bananas, eggs, and vanilla. Stir to incorporate flour mixture (do not overmix). Dividing evenly, spoon batter into muffin cups.
  3. With a toothpick swirl in the Nutella, about a ½ teaspoon each.
  4. Bake until a toothpick inserted in center of a cupcake comes out clean, 10 to 15 minutes. Remove cupcakes from pan; cool completely on a wire rack.

Labels: , , , ,

Wednesday, March 18, 2009

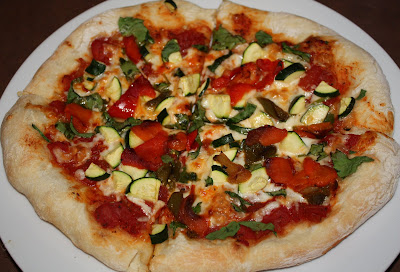
Artisan Bread in Five's Pizza Crust


Ok, I am sure everyone is sick of me talking about how amazing the Artisan Bread in Five Minutes a Day is, but in case you missed that memo I will remind you today:)


We made the master boule recipe and had huge success! We made a big crusty rustic loaf, 2 French baguettes, and 2 pizzas with just one recipe. It was so nice to have the dough in the fridge, whenever we were craving fresh bread or pizza, we just cut off a portion of the dough. This method really is magic.

Josh is a pizza fanatic, so of course we had to see if the dough lived up to our high pizza standards. We made 2 thin crust pizzas and the results were outstanding! The crust was perfect and again, it was SO easy!

So if you still haven't tried this method, get moving! You will be so glad you did! I love that you can make bread, pizza, calzones, sticky buns, bagels, etc. Your choices are endless! So get the book and get baking!! Anyone can do it, I promise!


Labels: ,

Tuesday, March 17, 2009

Snickerdoodle Blondies with Cinnamon Chips


Happy St. Patrick's Day. Sorry I didn't make anything green to celebrate. I would like to say Happy Birthday to my Grandpa! He is 94 today!!

Snickerdoodle Blondie recipes have been popping up all over the place. I have been wanting to make them ever since I saw them on Ingrid's blog:
3 B's...Baseball, Baking , & Books.

I love snickerdoodle cookies! A cookie with lots of cinnamon and sugar, how could you not like them? The last time I made them I threw in cinnamon chips and called them, Cinnadoodles. They were fabulous. I decided to add cinnamon chips to the Snickerdoodle Blondies too! I am glad I did. They were fantastic!

Transforming a snickerdoodle cookie into a bar was a genius idea. There was plenty of cinnamon and sugar to go around, thanks to the cinnamon chips and topping. The bars were thick, soft, and chewy.
I really liked the bar version. They are easy to make, travel well, and clean up is minimal. So get on board and make a pan of Snickerdoodle Blondies.


Snickerdoodle Blondies with Cinnamon Chips
Spotted on 3B's, original recipe comes from Dozen Flours
Here is my adaptation:)


(Printable Recipe)


2 2/3 cups all-purpose flour
2 teaspoons baking powder

1 teaspoon Kosher salt

1/2 teaspoon cinnamon (I added this)

2 cups packed brown sugar
1 cup butter, at room temperature

2 eggs, at room temperature

1 tablespoon vanilla extract

1 1/2 cups cinnamon chips
(I added these)
2 tablespoons white sugar

2 teaspoons cinnamon


Preheat oven to 350F. Lightly grease a 9 x 13 inch pan.
Sift together flour, baking powder, salt, and cinnamon and set aside. In large bowl, beat together butter, sugar, egg and vanilla until smooth.
Stir in the flour mixture until well blended. Stir in the cinnamon chips. Spread evenly in prepared pan (mixture will be similar to a cookie dough.) Combine white sugar and cinnamon in a little bowl. Evenly sprinkle cinnamon sugar mixture over the top of the batter.

Bake 25 minutes or until surface springs back when gently pressed. Cool slightly. While still warm, cut into bars with a sharp knife.

Labels: , , ,

Sunday, March 15, 2009

French Cooking Classes at Viking


We have part time jobs at the Viking Cooking School in Salt Lake City. We usually just work the weekend classes since the week days are so busy. Last Saturday we did a French pastry class and last night we did a French dinner party. Both classes were a lot of fun. 

We really enjoy working in the kitchen. We are assistants to the chefs, so we do a little bit of everything. The classes are "hands on" so the students make what they eat. The classes are very interactive. At the end of the night everyone sits down to enjoy the meal they cooked. I think it is great that they get to do the cooking and not just watch an instructor. The students really learn a lot and it is interesting to watch and help them along the way. 

We are also learning a lot from the chefs and students. We have met some great people and enjoy spending time in the kitchen together, especially such a nice one:)  Here are some random photos from the French classes we have done. Sorry they aren't that great, I haven't figured out the lighting yet:) ENJOY!

We made puff pastry. These are the Prosciutto Palmiers 
the almond ones are above! 


Mini Babas au Rhum


Gougeres


The students making Eclairs


French Onion Soup


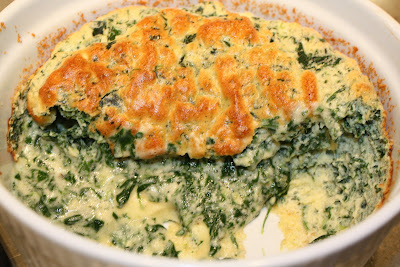
Spinach Souffle (half eaten)


Beef Wellington with Bernaise Sauce


Inside of the Beef Wellington


White Chocolate Mousse with Raspberry Coulis


If you are interested in taking a class check out Viking's website. They have a wonderful selection of classes. There are some really fun ones coming up too: Cupcakes and Cake Balls, Celebration Brunch, Souther Italian Dinner Party, Girls Night Out in Paris, and Kids and Teens classes for the summer. Just to mention a few:) If you are in Utah, come in and see us! We would love to assist you in a class! 

Labels: