Devils Workshop

has been moved to new address

http://www.devilsworkshop.org

Sorry for inconvenience...

Two Peas and Their Pod: May 2009

Friday, May 29, 2009

Terra Mia Restaurant Review


We made it to Palm Beach! Our resort is really nice and we are having a great time already. We don't have big plans for today, but that is what vacation is all about, right?

I love Italian food, that is no secret. When I heard a new Italian restaurant was opening in Orem Utah, I told Joshua we had to drive down and try it.

Terra Mia's food is fresh, fast, authentic Italian, at reasonable prices. I really liked the ambiance, lots of light and there is a huge tree in the middle of the restaurant. Yes, it is real:)


Ter
ra Mia serves salads, pasta, and pizza. We sampled several menu items and they were all fantastic. I was actually surprised at how good everything was for "fast" Italian food. Terra Mia uses quality ingredients and focuses on the presentation of the food. The staff was very helpful and our food was delivered to our table in minutes.

The Caprese salad was one of our favorites. Toasted baguette with Roma tomatoes, fresh mozzarella, basil, and olive oil. A great starter to any Italian meal. The mozzarella was superb, the perfect saltiness. I can't believe they only charge $7.50.


Josh loved the Penne Terra Mia pasta, one of th
eir signature dishes. Penne pasta is served with marinara sauce, Italian sausage, eggplant, mozzarella, egg slices, and parmesan cheese. Josh raved about how good the sauce was. The pasta was also cooked to perfection.


Now onto the
pizza. I've been to Italy and fell in love with the pizza. Terra Mia's pizza is very authentic, it brought me back to my time in Italy. Again, they use the freshest ingredients which really makes a difference. They even had their pizza oven shipped in from Italy. They are serious about their pizza!

I had the Margherita pizza-marinara sauce, mozzarella, parmesan, olive oil, and fresh basil. It was excellent. They have mastered the perfect crust. The menu has a long list of pizzas to choose from or you can create your own. I highly recommend the Margherita, it is a classic.


I could of left the restaurant full and content, but Terra Mia serves gelato, one of my favorite desserts, so of course I had to try it out. Every day th
ey have 12 differnet flavors of fresh gelato. I had a hard time choosing because every flavor looked amazing. I ended up ordering the hazelnut and coconut. Both were smooth and creamy. Josh tried the lemon gelato and it was very refreshing, I snuck a bite:)


Terra Mia's gelato is the BEST!! I have sampled a lot of gelato in Italy and in the states, we even had a gelato bar at ou
r wedding, but Terra Mia's gelato wins hands down! It tastes just like the gelato in Italy. I can't wait to go back and try more flavors!

If you are in Utah and loo
king for a new place to try, go to Terra Mia in Orem. You won't be disappointed. The location is great, right by the movie theater and University Mall. The service is great, the atmosphere is fun, and most importantly the food is top notch. To view their complete menu, visit their website.

Today is Terra Mia's Grand Opening, stop in and receive 10% off of everything on the menu. What are you waiting for? Ther
e is fresh, fast, authentic Italian waiting for you!

Terra Mia Ristorante
1050 S 750 E

Orem, Utah
www.terramiaonline.com


Labels:

Wednesday, May 27, 2009

Baked Penne Pasta with Italian Sausage


Last week Josh and his brother, Matt, spent numerous hours working in our yard. I feel guilty because I really didn't help much. I think I picked up a rake once, oops! They really worked hard and did a great job. I did contribute by feeding them though. That should count for something, right?

One night I made pasta for the boys. I love pasta because it is cheap, easy, and the choices are endless. We had leftover grilled Italian sausages and ricotta cheese so I decided to do a baked pasta. I added in onion, garlic, and roasted peppers too. I topped everything off with my homemade marinara sauce and mozzarella cheese.

The individual baked pastas came out nice and bubbly. The guys were thrilled to come in for dinner. I didn't taste it because I don't do meat, but the lack of conversation at the dinner table was a good sign. They devoured their pasta in minutes.

Sorry this recipe is kind of random. I just made it up as I was cooking. If you have questions let me know. I don't think you can mess it up! Just mix it all up, bake, and I am sure something good will come out of the oven:)

Tomorrow we are leaving for Palm Beach, Florida. We will be vacationing for an entire week. Josh's brother, Ben, and his wife, Whitney, are joining us. Should be a great time! We will try to check in from the beach! If anyone has Palm Beach suggestions-places to go or eat, let us know! Thanks friends!


Baked Penne Pasta with Italian Sausage

(Printable Recipe)


Penne pasta-cook until al dente, drain and set aside
Olive oil
Garlic-chopped
Onion, chopped
Fennel seed
Crushed red pepper
Basil, chopped
Roasted peppers-I used red and yellow-we had some in the freezer
Italian sausage-I used leftover grilled Colosimo's sausage, just cut it into chunks
Marinara sauce-I used my homemade sauce, but you can use store bought
Ricotta cheese
Mozzarella cheese

1. Spray baking dish with cooking spray. I used 2 individual dishes. You can use a big one for a large group. Spread marinara sauce on the bottom of the dishes.
2. In a skillet, heat olive oil. Add in onion, garlic, fennel seed, crushed red pepper, basil, and roasted peppers. Cook until tender.
3. Add in sausage chunks. Cook for a couple of minutes.
4. In a bowl, mix pasta with marinara sauce. Add in the pepper/sausage mixture.
5. Divide pasta evenly in dishes, or put all of it in one big dish.
6. Drop spoonfuls of ricotta cheese into the pasta dishes. Make sure to mix it a little bit. You want it to be in with the pasta/sauce mixture.
7. Sprinkle with mozzerella cheese and mix a little bit.
8. Cover the top of the pasta with more mozzerella and fresh basil.
9. Bake at 350 degrees for about 20 minutes or until bubbly.
10. Enjoy!

Labels: ,

Tuesday, May 26, 2009

Chocolate Cookies with Peanut Buter Chips


Did everyone have a nice Memorial Day weekend? We sure did. We spent the weekend at the Dewey's. We adopted ourselves into their family:) We had a couple of bbq's, enjoyed some pool time, basketball, baking, movies, runs/walks, and movies. The perfect weekend. It was hard to come back to work today.

I made several treats over the weekend. I love baking for crowds. Everything gets gobbled up which means no temptation for me:) I usually don't bake peanut butter treats because Josh is allergic, but I knew everyone else would love them.

I made chocolate cookies with peanut butter chips. A very chocolaty cookie, more like a brownie with peanut butter chips. Nothing too special or out of the ordinary, but just a good cookie. I did use yogurt and I am glad I did. The cookies were really soft. You really can't go wrong with the chocolate and peanut butter combo.


Chocolate Cookies with Peanut Butter Chips

(Printable Recipe)

1 cup all-purpose flour
¼ teaspoon baking soda
1/8 teaspoon salt
5 tablespoons butter
7 tablespoons unsweetened cocoa
2/3 cup granulated sugar

1/3 cup packed brown sugar

1/3 cup plain yogurt
(I used fat free)
1 teaspoon vanilla extract

1 cup of peanut butter chips

Preheat oven to 350ºF; line 2 baking sheets with baking paper, lightly coated with cooking spray. I used Silpats!
Lightly spoon flour into a dry measuring cup; level with a knife. Sift together flour, soda, and salt; set aside.

Melt butter in a large saucepan over medium heat. Remove from heat; stir in cocoa powder and sugars (mixture will resemble coarse sand). Add yogurt and vanilla, stirring to combine. Add flour mixture, stirring until moist. Stir in peanut butter chips. Drop by level tablespoons 2 inches apart onto prepared baking sheets.


Bake for 10 minutes or until almost set. Cool on pans 2 to 3 minutes or until firm. Remove cookies from pans; cool on wire racks.

Labels: , ,

Friday, May 22, 2009

Recipe for Rhubarb Sorbet


I am sorry if you are sick of my rhubarb posts. I promise I will get off my kick soon! I just made rhubarb sorbet though and it is out of this world good! I had no idea it would be so tasty. I am still kind of surprised!

I used a recipe I saw on Simply Recipes. It was really easy. The only not so fun part was straining the rhubarb. It just took some time, but really nothing to complain about. I chilled the base overnight and churned it up the next day in our Cuisinart dream machine.

The results were incredible! The sorbet was SO creamy. It tasted more like gelato than sorbet, but without any cream! I was hoping for a deeper red color, but oh well, I am partial to pink anyways. The rhubarb flavor was perfect too, not too sweet, just right! I loved the kick from the orange zest too!

This is one of my new favorite treats. It's very light, refreshing, and perfect for a hot day! I am sure it would be a hit at a Memorial Day BBQ, so try it and impress your friends and family. Happy Holiday weekend everyone! I LOVE long weekends!


Rhubarb Sorbet
Recipe from Garrett McCord of Vanilla Garlic
Saw on Simply Recipes

(Printable Recipe)

3 1/2 cups of chopped fresh rhubarb (4-5 stalks)
2 1/2 cups of water

1 2/3 cups of sugar

1/4 teaspoon of salt

2 teaspoons of orange zest
2 tablespoons of corn syrup

Place chopped rhubarb, sugar, water, salt, and orange zest in a large saucepan. Stir it all up. Bring to a boil. Reduce heat to low, cover it and let it simmer for about 5 minutes. The rhubarb will get tender and start to dissolve if you stir it. It will smell good too:)

Cool the rhubarb mixture for about 10 minutes. Purée in a blender or food processor until smooth. You will need to do this in a couple of batches. It will get a little messy, but that is fun, right? Press through a fine mesh strainer to get rid of the pulp. Stir in the corn syrup. Cover and refrigerate until chilled. I let mine chill overnight.

Process in your ice cream maker according to the manufacturer's instructions. The sorbet will be soft and creamy! Put in a container and freeze.

Makes about one quart.

Labels: , ,

Wednesday, May 20, 2009

Rhubarb Apple Cinnamon Muffins


This is rhubarb week on our blog. I just can't get enough! I had no idea rhubarb was such a gem. It is so nice to walk outside and chop rhubarb from our own yard. I am loving our four plants. Thanks to whoever lived in the house before us. We owe our rhubarb obsession all to you!

I appreciate all of your rhubarb recipe suggestions. I now have tons of recipes to try. I wish I had ten plants. I decided to try rhubarb muffins next.

I really didn't know what kind of muffin to make. I just started playing around with ingredients, adding a little bit of this and that. I used a Granny Smith apple to compliment the rhubarb. I threw in some cinnamon, nutmeg, and a pinch of all-spice. I tried to keep this one healthy so I used applesauce, canola oil, and whole wheat flour. I also added a cinnamon crunch topping for the grand finale.

I loved these muffins. They are a new favorite. I made big ones and mini ones and they were both amazing. They were plenty moist due to the applesauce, oil, rhubarb, and apple. I loved the tart rhubarb flavor paired with sweet brown sugar and cinnamon. I am glad I added the cinnamon crunch topping, it really made these muffins marvelous!

So if you haven't tried rhubarb yet, what are you waiting for? Try my strawberry rhubarb crumb cake or these magnificent muffins! You won't be disappointed.


Rhubarb Apple Cinnamon Muffins

(Printable Recipe)

2 1/2 cups chopped rhubarb
1 chopped Granny Smith apple
2 eggs
1 cup low-fat buttermilk
1/4 cup canola oil
1/2 cup non sweetened applesauce
1/2 cup white sugar
1/2 cup brown sugar
2 teaspoons vanilla
1 cup all-purpose flour
1 cup whole wheat flour
1 teaspoon baking soda
2 teaspoons baking powder
1/2 teaspoon salt
2 teaspoons cinnamon
Dash of nutmeg
Pinch of all spice

Cinnamon Crunch Topping:
1/3 cup brown sugar
1/4 cup flour
1/4 cup oats
1 teaspoon cinnamon
1 1/2 T cold butter
Cinnamon/sugar mixed

1. Preheat the oven to 350 degrees. Spray muffin tins or use paper liners.
2. In a large bowl whisk together the dry ingredients.
3. In a different bowl whisk together the wet ingredients until well combined.
4. Pour the wet ingredients over the dry ingredients and mix slowly. Be gentle with the mix:)
5. Add in the rhubarb and apple. Mix gently.
6. Make the cinnamon crunch topping. Mix all of the ingredients, except the additional cinnamon and sugar, in a small bowl. I use my hands. You want it to be a crumbly mixture.
7. Divide the muffin mixture into muffin tins. I did regular and mini muffins. I got 12 regular muffins and about 20 little ones.
8. Sprinkle the crumb topping over the muffins. Add additional cinnamon/sugar if you wish. I suggest you do!
9. Bake for about 20 minutes. The little ones will be done sooner. Just watch them and do the toothpick test!
10. Cool and enjoy. They are best eaten the day you bake them.

Labels: , , , ,

Sunday, May 17, 2009

Strawberry Rhubarb Crumb Cake


We bought a house at the end of last summer, soon after we were married. I love our home, but I had no idea how many projects would pop up. For the past two weeks we have been putting in a sprinkler system. Ok, I really shouldn't say we, Josh has been putting in the sprinkler system. I am lucky to have such a hard working husband, he is very handy:)

Well, it is almost done. Yahoo! The hydroseed is going in on Tuesday and hopefully our grass will be up in no time. Next on the list, our garden. We've planted some tomatoes and flowers, but we have more to do!

We did discover four huge rhubarb plants in our yard. The previous owners must of planted them and I am SO glad they did. I have fallen head over heels for rhubarb. I know I've tasted it before but I don't remember being too fond of it. I didn't want the rhubarb to go to waste, so I decided to try out some new recipes.

I tried a Strawberry Rhubarb Crumb Cake that I saw on Sugar Plum's blog. I figured this would be a safe one to start with. The cake part was very basic. I scattered the sliced strawberries and rhubarb over the batter. I loved their bright red color. I also added a crumb topping, after it baked for awhile.

I wasn't really sold on the rhubarb idea, so I had Josh taste it. He LOVED it so of course I had to have a bite and WOW! I was surprised at how good it was. I loved the tartness of the rhubarb paired with the sweet strawberries and sugary, crunchy crumb topping. This cake is a winner! We took it to a BBQ and our friends are now big rhubarb fans!

I still have a lot of rhubarb to use up. If you have any favorites, please share! What can I say? I have a new crush:)


Strawberry Rhubarb Crumb Cake
Adapted from Sugar Plum

(Printable Recipe)

1 cup all-purpose flour
1 1/4 teaspoon baking powder
1/4 teaspoon salt
1/2 teaspoon cinnamon (I added this)
6 tablespoons unsalted butter, softened
1/2 cup granulated sugar
2 large egg yolks
1 teaspoon vanilla extract
2/3 cup milk (I used skim)
1 cup sliced strawberries
2/3 cup finely chopped rhubarb

Crumb Topping:
3/4 cup firmly packed brown sugar
1/2 cup all-purpose flour (I used 1/4 cup flour)
1/3 cup old fashioned oats (I added these)
1 teaspoon cinnamon (I added this) 5 tablespoons chilled unsalted butter, cut into small pieces (I only used 4 tablespoons)

Directions: Preheat oven to 350 degrees F. Grease and flour 1 (9-inch) round cake pan.
In a medium mixing bowl, sift together 1 cup flour, baking powder, salt, and cinnamon. In a large mixing bowl, beat together 6 tablespoons butter and granulated sugar until creamy, about 1 minute; beat in yolks and vanilla until combined. Gradually beat in flour mixture, alternating with milk until combined, about 1-2 minutes. Spread cake batter evenly into prepared pan. Top batter with strawberries and rhubarb. Bake for 20 minutes.

Meanwhile, prepare the crumb topping: Combine brown sugar, flour, oats, and 4 tablespoons butter; knead together using fingertips or a fork until well combined and mixture starts to clump together. Keep in freezer until ready for use. When cake has baked 20 minutes, top evenly with crumb mixture. Continue baking for an additional 15-20 minutes or until golden brown and a toothpick inserted into cakes comes out with moist crumbs attached. Cool for 30 minutes before running a knife around outside edges. Remove cake from pan and cool on a rack.

Labels: , , ,

Thursday, May 14, 2009

Recipe for Lime Bars


I've always loved celebrating birthdays. Of course I love my own special day, but I enjoy celebrating anyone and everyone's birthday. I think birthday celebrations should last for the entire month too. Josh's birthday was last weekend, we already had the party, cake, presents, etc. but I am not done yet!

I made Josh another birthday treat. This time it was all about lime, his favorite! I found a great recipe for Lime Bars on Evil Shenanigans. I knew the bars would be a hit with the hubs and I was correct.

I loved the graham cracker crust with lime zest. It gave the bars an added zing:) The lime filling was very creamy and very tart. I used fat free sweetened condensed milk and the filling was plenty rich and plenty sweet. This is not a healthy dessert, it's still loaded with sugar and butter in the crust, but why not use fat free if the results are amazing?

Joshua really enjoyed his special birthday bars. I know he will be asking for these again!


Lime Bars

Recipe from Evil Shenanigans

(Printable Recipe)

For the crust:
1 1/2 cup graham cracker crumbs
6 tablespoons salted butter, melted
1/4 cup sugar
zest of one lime

For the filling:
2 large egg yolks
1-14 oz. can fat free sweetened condensed milk
1/2 cup lime juice

Heat the oven to 350F, then grease an 8″ square pan. I used my Pyrex glass dish.

Combine the graham cracker crumbs, melted butter, sugar, and zest. Press into the prepared pan, pressing the crust mixture one inch up the side of the pan. Bake for 10 minutes. Allow to cool completely.

Once the crust is cooled combine the egg yolks and condensed milk until well mixed. Stir in the lime juice and combine. It will begin to thicken slightly.

Pour the filling into the crust, making sure the filling reaches the edges. Bake for 15 minutes, or until just set.

Cool to room temperature, then chill for at least one hour, overnight is better. Store in the fridge for up to 5 days.

Labels: , ,

Tuesday, May 12, 2009

Blueberry Lemon Loaf Cake


Josh claims he doesn't like sweets, but he does. Chocolate isn't his favorite, but that doesn't stop him from devouring my cookies:) He also loves anything lime or lemon. We both aren't the biggest cake fans, but it was his birthday and you have to have cake, right?

I decided to make a blueberry lemon cake for his birthday BBQ. It is a spin off of one of our favorite loaf cakes. This time I added in fresh blueberries and I am glad I did. They made the cake extra special!

Josh was excited for his cake, but our niece, Aubrey, was VERY excited. She couldn't wait to sing Happy Birthday to Uncle Josh. She helped him blow out his candle. She was one happy camper!

You can't go wrong with this cake. It is easy, very moist, lemony, and the blueberries add extra goodness and love. This is great for any celebration or just because! And don't skip the syrup or glaze, it makes the cake! Bring on the lemon!


Blueberry Lemon Loaf Cake
Adapted From Barefoot Contessa


(Printable Recipe)

1 1/2 C. all-purpose flour
2 tsp. baking powder
1/2 tsp. kosher salt
1 C. plain whole-milk yogurt (I used low fat sour cream)
1 1/3 C. sugar, divided
3 extra-large eggs
2 tsp. grated lemon zest (2 lemons)
1/2 tsp. pure vanilla extract
1/2 C. vegetable oil ( I used canola oil)
3/4 cup fresh blueberries (coated with flour to stop them from sinking)
1/3 C. freshly squeezed lemon juice

Glaze:
1 C. confectioners’ sugar
2 Tbs. freshly squeezed lemon juice

Directions

Preheat the oven to 350 degrees F. Grease an 8 1/2 by 4 1/4 by 2 1/2-inch loaf pan. Line the bottom with parchment paper. Grease and flour the pan.

Sift together the flour, baking powder, and salt into 1 bowl. In another bowl, whisk together the sour cream, 1 cup sugar, the eggs, lemon zest, and vanilla. Slowly whisk the dry ingredients into the wet ingredients. With a rubber spatula, fold the oil into the batter, making sure it’s all incorporated. Slowly fold in the blueberries. Pour the batter into the prepared pan and bake for about 50 minutes, or until a cake tester placed in the center of the loaf comes out clean.

Meanwhile, cook the 1/3 C. lemon juice and remaining 1/3 C. sugar in a small pan until the sugar dissolves and the mixture is clear. Set aside.

When the cake is done, allow it to cool in the pan for 10 minutes. Carefully place on a baking rack over a sheet pan. While the cake is still warm, pour the lemon-sugar mixture over the cake and allow it to soak in. Cool.

For the glaze, combine the confectioners’ sugar and lemon juice and pour over the cake. Slice and serve!

Labels: , , ,

Sunday, May 10, 2009

Josh's Birthday BBQ


Josh's birthday was on Saturday. I surprised him with a new grill. He had no clue. He walked into the garage and there it was! I am glad my dad was in town to help me pick it out and bring it home. 

We had a birthday bbq to celebrate. It was great fun and Josh was a master on the new grill. He grilled up Italian Sausages with peppers and onions, Lemon Pepper Chicken, Buffalo Chicken, and Portobello Mushrooms. There was something for everyone to enjoy. We also had a green salad, chips and salsa, watermelon, and juicy pineapple. Everything was delicious! Oh, and of course we had cake, but I will be sharing the recipe in my next post, so come on back! 

We are looking forward to many more bbq's this spring and summer! 


No real recipes to share, everything was super easy! For the chicken, Josh marinated some of it in Frank's Red Hot Buffalo sauce. Josh really liked it, not as good as his hot wings, but still good:) He also seasoned some chicken with fresh lemon juice and lemon pepper. The Italian Sausages were from Colosimo's, the guys added grilled peppers and onions. I brushed the portobello mushrooms with balsamic vinegar. Really simple and really tasty. 

Happy Birthday Joshua! Thanks for being the greatest husband! I love you! 

Labels: ,

Friday, May 08, 2009

Dark Chocolate Orange Shortbread


Sorry for my lack of posts lately, life has been really hectic for us. Work is crazy busy for me and Joshua is in the process of installing a sprinkler system in our yard. Talk about a lot of work! It is still a mess right now, but hopefully we will have a beautiful yard soon. My dad has been a huge help, he picked a good week to visit, ha! Our lilacs are in full bloom and that makes me very happy. There is nothing like the smell of sweet lilacs breezing through the house on a sunny Spring day.


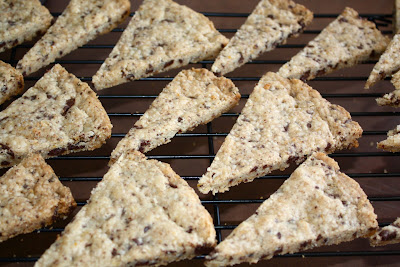
Today I am sharing a recipe for Dark Chocolate Orange Shortbread. My dad loves butter, chocolate, and oranges, so I knew this would be a perfect treat to have around. The buttery shortbread was the perfect background for the dark chocolate orange. I think this is the perfect treat for a picnic too. So bake up some shortbread, pack your picnic basket with goodies, and enjoy the Spring sunshine.


Dark Chocolate Orange Shortbread


(Printable Recipe)


2 sticks of unsalted butter

1 tsp salt

3/4 cup sugar

Zest of 2 oranges (about 3 tablespoons)

1 tsp vanilla

2 1/3 cups flour

1 cup dark chocolate, chopped into tiny pieces


1. Preheat oven to 300 degrees. Grease 2 9 inch cake pans.

2. Place the sugar and orange zest in a bowl. Rub the zest in with your fingers. In the bowl of a mixer, cream together butter, sugar/orange mix, salt, and vanilla.

3. Chop chocolate. You want the pieces a little smaller than chocolate chips.

4. Beat the flour and the chocolate with the butter mixture, until well combined.

5. Divide the dough in half and press in prepared cake pans. Make sure each pan is even. Smooth the surface and prick the dough with a fork.

6. Bake for 40 minutes, until golden brown on the edges. Remove and loosen the edges with a knife.

7. Wait five minutes, then carefully place the shortbread out onto a clean work surface, all in one piece.

8. Using a pizza wheel or knife, cut into wedges. Do this while it is still warm so you can cut it. Transfer wedges to a cooling rack.

Labels: ,

Tuesday, May 05, 2009

Italian Sausage Lasagna


My dad is visiting from Illinois. He drove out to Utah last week, which is a 22 hour drive. My dad doesn't believe in stopping, only to fill up on gas, licorice, and M&M's. He says he just closes his eyes and keeps on driving:) We are having a great time so far. It is always nice having him around.

Sunday night my sister's family came over for dinner. We made homemade lasagna, an Artisan Bread in Five Loaf, and salad for dinner. Everything was quite tasty. We had to do two lasagnas though, a meat lover's and a veggie. I don't mind pleasing everyone, different strokes for different folks:)

Today I am sharing the Italian sausage recipe. I didn't have a taste, but everyone else enjoyed it. Josh made homemade noodles and I worked on the sauce and fillings. The lasagna came together in no time. I included the recipes for the sauce and noodles. Of course you can use store bought, but we believe fresh is best:) We use our KitchenAid mixer and pasta attachment and it makes pasta making super simple.

It was fun having the family over for dinner. As you can see below my niece, loved the ABin5 bread. She is always the life of the party!


Italian Sausage Lasagna

(Printable Recipe)

Marinara Sauce

Olive oil
1 onion, chopped
3 cloves garlic, minced
Crushed red pepper flakes
Fennel seeds
3 cans diced tomatoes
1 small can tomato sauce
Fresh basil, chopped
Italian seasoning
Salt and black pepper

1. Heat oil in a large skillet. Add onion, cook until tender. Add garlic, red pepper flakes, and fennel seeds.
2. Add in tomatoes and tomato sauce. Stir.
3. Add in fresh basil, Italian seasoning, salt and pepper.
4. Let simmer for 30 minutes.

Noodles

4 large eggs
1 T water
3 1/2 cups sifted all purpose flour
1 tsp. salt

1. Place eggs, water, flour and salt in mixer bowl. Attach flat beater. Turn to Speed 2 and mix for 30 seconds.
2. Put on the dough hook. Turn to Speed 2 and knead for 2 minutes. Remove dough and knead by had for 2 minutes.
3. Let the dough rest for 20 minutes. Follow pasta maker's instructions. You can roll it by hand, but we use our KA pasta attachment, which is worth every penny!

Lasagna

Lasagna noodles
Italian sausage
Fennel seeds
Crushed red pepper
2 cups Ricotta cheese
2 eggs
Black pepper
Dried basil
1/2 cup Parmesan cheese,plus more for the top of lasagna
Mozzarella cheese
Sauce

1. In a large skillet brown the Italian sausage with fennel seeds and crushed red pepper. I don't measure the seasons, just a dash or two. Cook sausage until brown and cooked all the way through.
2. Mix ricotta cheese, eggs, black pepper, dried basil, and parmesan in a small bowl.
3. In a large casserole dish or pan start creating the lasagna.
4. Spoon some marinara sauce at the bottom, add a layer of noodles.
5. Next, add sauce, ricotta mixture, sausage, and mozzarella cheese. I don't measure just spread around evenly. Be generous with all of the ingredients.
6. Add another layer or noodles and continue the layering process.
7. When you are finished layering, top the lasagna off with mozzarella cheese and parmesan cheese.
8. Bake in a 350 degree oven for about an hour or until bubbly.
9. Let it sit for 10 minutes before cutting.

Labels: , , ,

Sunday, May 03, 2009

Cranberry Orange Buttermilk Cookies


I love baking with buttermilk, as most of you know. I recently made lemon buttermilk cookies and they were fantastic. I decided to try them again, but with a twist.

This time I made cranberry orange cookies. The base is the same, but I added in orange zest and dried cranberries. I finished the cookies off with a orange glaze. So how do they compare to the lemon? It is a toss up, I love them both.

I really enjoyed the dried cranberries. They gave the cookies a little something extra. The orange glaze was nice too. I think I will add these to my fall/holiday baking list. They really are wonderful and cranberry/orange is such a great combination.


Cranberry Orange Buttermilk Cookies

For the cookies:

3/4 cup dried cranberries

1 ½ cups unbleached all-purpose flour
Zest of one orange
¼ tsp. baking soda
¼ tsp. salt
6 Tbsp. (3 oz.) unsalted butter, at room temperature
¾ cup granulated sugar
1 large egg
½ tsp. vanilla extract
1/3 cup well-shaken buttermilk

For the glaze:

Confectioners sugar
Orange juice, fresh from the orange

Orange zest

Line 2 large baking sheets with parchment paper or silicone liners. Preheat the oven to 350°F.

Put the dried cranberries in a small bowl with hot water. Allow them to sit for a couple of minutes. Then drain. This just plumps them up:)


In a medium bowl, whisk together the flour, zest, baking soda, and salt.

In the bowl of a stand mixer, beat the butter briefly, until creamy. Add the sugar, and beat until pale and fluffy. Add the egg, and beat well to mix. Add the vanilla, and beat briefly again. Mix in the flour mixture and the buttermilk in batches at low speed, beginning and ending with the flour. Scrape down the sides of the bowl with a rubber spatula as needed. Add in the dried cranberries.

Drop the dough by level tablespoons onto the prepared baking sheets, leaving about 1 ½ inches between each cookie. Bake, 1 sheet at a time, for about 11 minutes per batch. Cool the cookies on the baking sheet for 1 minute; then transfer them to a wire rack.

For the glaze, whisk together the sifted confectioners sugar, orange juice, and zest. I just guess on the amount. Brush or spoon the glaze onto the warm cookies. Allow cookies to sit on the rack until the glaze is set.

Labels: , ,